Il nest pas facile de bien cuire un poulet tout en le gardant juteux et savoureux. Deux risques déchec existent. Un poulet insuffisamment cuit peut entraîner des maladies dorigine alimentaire comme la diarrhée et des ballonnements. À linverse, un poulet trop cuit a un goût très sec et difficile à mâcher. What can you do to make sure that your cooked chicken is safe to eat while still tasting great? The answer lies in a simple kitchen tool: a meat thermometer.
Et pourtant, une question importante demeure : une fois que vous avez un thermomètre à viande en main, où le placer dans un poulet pour obtenir les meilleurs résultats ? Pour répondre à cette question, nous vous expliquons comment utiliser au mieux un thermomètre à viande et cuire le poulet à la bonne température. As you roast a chicken for a family get-together or cook a chicken breast for a summer barbecue, knowing where to put the thermometer in the chicken is the key to making the perfect chicken dish.
Hey there, grill masters and kitchen warriors! If you’ve ever wrestled with a whole chicken, tryna figure out if it’s cooked through without turnin’ it into a dry mess, you’re in the right spot. I’ve been there, starin’ at a bird fresh outta the oven, wonderin’ if I’m about to serve up a health hazard or a piece of cardboard. The secret weapon? A meat thermometer. But here’s the kicker—knowin’ where to probe a whole chicken is the game-changer. Stick with me, and I’ll walk ya through the exact spots to check, why it matters, and how to avoid the usual screw-ups. Let’s get that juicy, safe, perfectly roasted chicken on the table!
Why Probing a Whole Chicken Right Is a Big Deal
Let’s talk about the “why” before we get to the “where.” There’s more to cooking a whole chicken than just making it taste good. You also have to be careful not to get sick. If you don’t cook it long enough, bugs can get inside and ruin your day. If you cook it too long, the food will be tougher than old boots. A meat thermometer takes the guessin’ out of the equation. This will let you know when that bird is safe to eat and still very tender. But if you put that probe in the wrong spot, you’ll get a bad reading, and all your work will have been for nothing. So, placin’ it right is everything.
Where to Probe a Whole Chicken: The Sweet Spots
Alright, let’s cut to the chase When you’re dealin’ with a whole chicken, there’s two main spots you gotta check to make sure it’s cooked proper Grab your thermometer, and let’s do this.
- The Breast (Thickest Part): This is your first stop. Find the thickest chunk of the breast—usually about three-quarters of the way along, headin’ toward the drumstick area. Stick the probe in deep, like 1.5 to 2 inches, but don’t let it touch any bone. Bone heats up different than meat, and it’ll throw off your reading big time. You’re aimin’ for a temp of 165°F here. If it hits that, the white meat’s good to go.
- The Thigh (Thickest Part): Next up, check the thigh, right above where it meets the drumstick. Again, poke into the meatiest part, steerin’ clear of bone. Thighs can handle a bit more heat, so you’re lookin’ for 175-180°F for that perfect, succulent texture. Since thighs cook slower than breasts, if this spot’s at the right temp, the rest of the bird is likely done too.
Why check both? ‘Cause a whole chicken ain’t uniform. The dark meat in the thighs takes longer to cook than the white meat in the breast. If you check both places, you can be sure there are no undercooked pieces hiding.
How to Probe Like a Pro
So you know where to poke a whole chicken, let’s talk about how to do it right. I know I’ve messed up this before, so let me save you the trouble.
- Get the Right Tool: Use a good meat thermometer, preferably one with a thin probe for precision. Digital ones are dope ‘cause they read fast.
- Insert Deep Enough: Don’t just skim the surface. Push that probe into the thickest meat till only the handle’s stickin’ out. If it’s too shallow, you’re measurin’ the outside, not the core.
- Avoid Bone and Fat: I said it before, but it’s worth repeatin’. Bone and fat pockets mess with the temp reading. Wiggle the probe a lil’ if you think you’ve hit somethin’ hard—move it to pure meat.
- Wait for a Steady Read: Don’t yank it out too quick. Give it a sec till the numbers stop jumpin’ around. That’s your true temp.
- Check Both Spots: Always do breast and thigh on a whole bird. One readin’ ain’t enough.
If you’ve got a fancy thermometer with two probes, even better! Stick one in each spot and monitor ‘em at the same time. Saves ya from playin’ musical chairs with the probe.
What Temps You’re Lookin’ For
It’s half the battle to know where to poke a whole chicken. The other half is knowin’ what numbers mean “done. Here is a quick cheat sheet in the form of a table for you to look over:
| Chicken Part | Target Temp (°F) | Why This Temp? |
|---|---|---|
| Breast | 165 | Safe to eat; kills bacteria fast. |
| Thigh | 175-180 | Breaks down collagen for tender meat. |
A lil’ tip from me you can pull the chicken off the heat a couple degrees shy of these temps—say, 162°F for breast—‘cause it’ll keep cookin’ a bit while it rests. Just keep an eye on it to make sure it hits the safe zone before divin’ in.
Why These Spots Matter More Than Others
You might be thinkin’, “Why not just stab the thermometer anywhere?” Fair question. Here’s the deal: the thickest parts of the breast and thigh are the slowest to cook. If they’ve hit the safe temp, the thinner bits are almost guaranteed to be cooked through too. Probing in a skinny spot, like near the wing, might trick ya into thinkin’ the whole bird’s done when the center’s still raw. That’s a one-way ticket to food poisonin’ town. Plus, avoidin’ bone is key ‘cause it conducts heat weird—like, way faster than meat—so your reading won’t tell the real story.
Special Cases: Stuffed Chicken and More
Got a stuffed chicken on your hands? There’s an extra step, my friend. Not only do ya gotta probe the breast and thigh like usual, but you also need to check the stuffin’ inside. That stuffin’ has to hit 165°F too, ‘cause it’s sittin’ in raw meat juices and can harbor nasty bugs if undercooked. Stick the probe right into the center of the fillin’ and make sure it’s good to go.
Another scenario—if you’re smokin’ your bird instead of roastin’, the same rules apply for where to probe a whole chicken. Just note that smokin’ takes longer, and dark meat can handle more heat without dryin’ out, so don’t panic if the thighs creep past 180°F a tad.
Common Mistakes We All Make (And How to Dodge ‘Em)
I’ve screwed this up plenty, so lemme spill the beans on pitfalls to watch for when probin’ a whole chicken. These are straight from my own kitchen disasters.
- Stickin’ Too Close to Bone: Guilty as charged. Bones heat up quicker, givin’ ya a false high readin’. Always aim for meat only.
- Not Goin’ Deep Enough: If the probe’s just kissin’ the surface, you’re measurin’ the outside, not the inside where it counts. Push it in deep, fam.
- Skippin’ Parts: Don’t just check the breast and call it a day. Thighs cook slower, so ignorin’ ‘em might leave ya with raw dark meat.
- Forgettin’ to Rest It: Pullin’ the chicken out and slicin’ right away? Big no-no. Let it sit 15-20 minutes after cookin’. The temp can rise a bit, and juices settle for max tenderness.
- Not Checkin’ Your Gear: If your thermometer ain’t calibrated, it’s lyin’ to ya. Test it now and then in ice water to make sure it’s readin’ right.
Avoid these, and you’re golden. Trust me, I learned the hard way after servin’ up some chewy, half-cooked thighs once. Never again.
What If the Breast’s Done But Thighs Ain’t?
This happens more than you’d think. The breast hits 165°F, but the thighs are laggin’ behind at like 170°F. Don’t sweat it—there’s a fix. Here’s what I do: position the bird so the dark meat’s closer to the heat source from the start. Thighs can take more heat without turnin’ to dust, unlike the breast. If it’s still uneven when you check, carve off the breasts—cut along the breastbone with a sharp knife—and set ‘em aside under foil to rest. Then toss the rest of the bird back on the heat till the thighs hit 175-180°F. Easy peasy, and nothin’ gets overcooked.
Tools That Make Probing Easier
While we’re at it, let’s talk gear. A basic meat thermometer does the trick, but if you wanna level up, grab one with dual probes. You can monitor breast and thigh at the same time without playin’ switcheroo. Some even connect to your phone with apps that buzz ya when temps are hit. Pretty slick, right? I got one a while back, and it’s been a lifesaver for big roasts. Just make sure whatever you use has a thin probe for accuracy and can handle high heat if you’re grillin’ or smokin’.
Why Food Safety Ain’t No Joke
Lemme get real for a sec. Cookin’ chicken to the right temp ain’t just about taste—it’s about keepin’ you and your crew safe. Raw or undercooked chicken can carry some gnarly stuff that’ll have ya huggin’ the toilet. Hittin’ at least 165°F in the breast (and ideally higher in the thigh) kills off that junk in seconds. It’s a small step that saves a lotta pain. I’ve had a close call or two before I got serious about probin’ right, and I ain’t takin’ that risk again.
Restin’ Your Bird: The Final Touch
After you’ve probed and confirmed your whole chicken’s at the right temps, don’t just dig in. Let that baby rest. Set it on a cuttin’ board or platter, loosely tent it with foil, and give it 15-20 minutes. This lets the juices spread out inside the meat instead of spillin’ all over when ya cut it. Plus, the temp might tick up a few degrees, so somethin’ at 162°F when ya pull it could hit 165°F while restin’. It’s like givin’ your chicken a lil’ spa moment before the big reveal.
Bonus Tips for Different Cookin’ Styles
Whether you’re roastin’ in the oven, smokin’ on a grill, or even deep-fryin’ a whole bird (mad respect if ya are), the spots to probe stay the same. But here’s a few extra nuggets of wisdom based on how ya cook:
- Roastin’: Standard oven at 350-400°F works fine. Probe as usual, and expect a 3-5 pound bird to take 1.5-2 hours.
- Smokin’: Go low and slow at 225-250°F. It’ll take 3-4 hours, but the flavor’s worth it. Dark meat can go a lil’ over 180°F without issues.
- Grillin’: Indirect heat is your friend for a whole chicken. Keep probin’ the thickest parts, and flip if needed to even out cookin’.
No matter the method, where to probe a whole chicken don’t change. Stick to the breast and thigh, avoid bone, and you’re set.
Wrappin’ It Up: Probe Smart, Eat Happy
So there ya have it, folks. Knowin’ where to probe a whole chicken is the diff between a meal that’s meh and one that’s freakin’ amazin’. Hit that thickest part of the breast at 165°F and the thigh at 175-180°F, stay clear of bone, and let that bird rest before carvin’ up. Dodge the common goofs like shallow probin’ or skippin’ spots, and you’ll be servin’ up juicy, safe chicken every dang time. I’ve messed up enough roasts to know this stuff works, and now it’s your turn to nail it. Got a thermometer handy? Go grab that chicken and put this to the test. Drop a comment if ya got tricks or tales of your own—I’m all ears! Let’s keep the kitchen vibes high and the food even higher. Cheers to epic eats!
Comment utiliser le ThermoPro TP972 pour mesurer la température du poulet
Here is a step-by-step guide on how to use the ThermoPro TP972 Twin TempSpike Plus 600FT meat thermometer without a cord to check the temperature of the chicken.
Étape 1. Téléchargez et installez lapplication TempSpike
Once you have your ThermoPro TP972, scan the QR code on the user guide to get the TempSpike app on your phone. Vous pouvez également la télécharger sur lApp Store dApple et le Google Play Store. Cet appareil est compatible avec iOS et Android.
Étape 2. Activez le Bluetooth sur votre smartphone
Sur votre smartphone, allez dans Paramètres et activez votre Bluetooth.
Étape 3. Chargez le booster et la sonde
Connectez le câble de chargement USB fourni à nimporte quel chargeur USB pour charger le booster.
Étape 4. Associez la sonde au booster
Le booster et les sondes sont pré-appairés via Bluetooth. Après avoir retiré la sonde du booster, la température mesurée saffichera sur lécran LCD.
Étape 5. Associez le booster à votre smartphone
Allumez le booster en appuyant sur le bouton « S ». Retirez une sonde du booster pour activer lappareil. Lancez lapplication TempSpike sur votre smartphone et appuyez sur le bouton « Ajouter un appareil ». Sélectionnez ensuite Twin TempSpike Plus dans la liste.
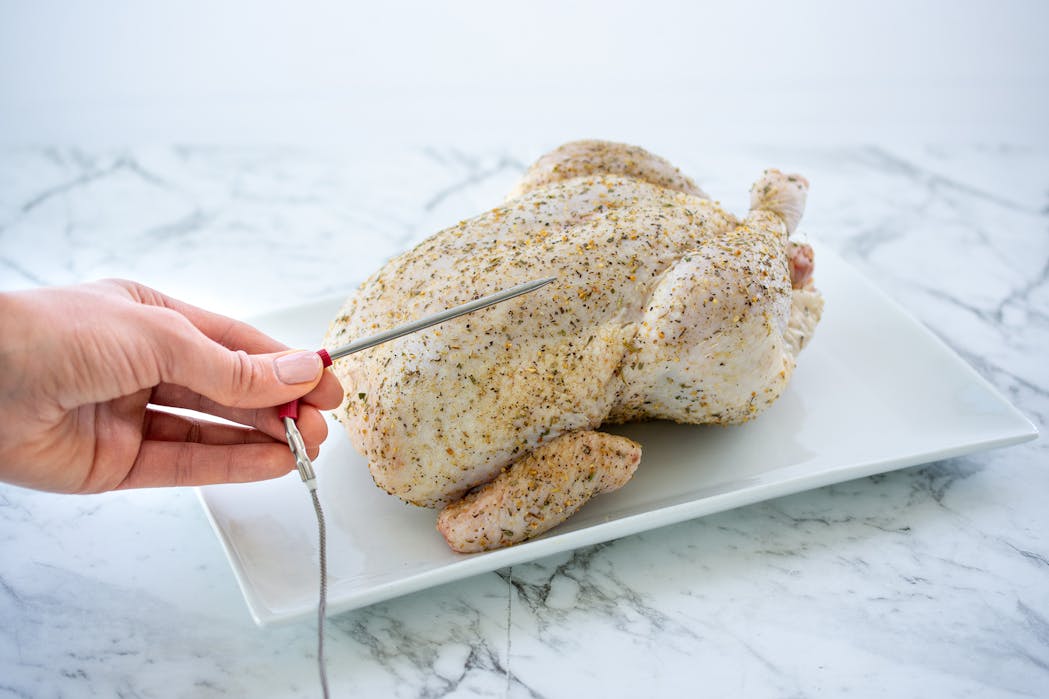
Étape 6. Insérez la sonde dans le poulet Avant de commencer la cuisson, insérez les sondes dans les parties les plus profondes du poulet, comme la poitrine et la cuisse.
You can set the desired cooking temperature or pick the type of meat and cooking level in the TempSpike app. Une fois la température atteinte, une alarme retentira depuis lapplication et/ou le booster.
Note: Pour de meilleurs résultats, insérez complètement la sonde dans le poulet, en laissant uniquement la poignée exposée à lextérieur.
Comment mesurer la température du poulet avec un thermomètre à viande
Cuisiner du poulet parfaitement à chaque fois est désormais plus facile grâce au Thermomètre à viande sans fil ThermoPro TP972 Twin TempSpike Plus de 183 m . Il vous permet de mesurer simultanément la température interne de deux parties différentes du poulet, jusquà 183 m de distance, pour un poulet cuit à la perfection.

Poultry Probe Placement | MEATER Product Knowledge Video
FAQ
What should chicken be probed at?
Armed with an accurate thermometer like the Thermapen, you can verify the safety and quality of your chicken—regardless of its color. For 165°F (74°C), a probe should read in the middle of a chicken breast, leg, or thigh when it’s ready to eat.