This is the only chicken stock recipe you’ll ever need. It’s an excellent all-rounder that’s nice and clear, with the ideal balance of flavour, nutrients and richness. Use it for everything from clear soups to rich stews, gravies and creamy sauces.
Making chicken stock is easier than making beef stock, and it makes everything better, which is what we want to do!
Stocks are the foundation for countless dishes in many cuisines. Chicken stock is one of the most common and versatile stocks in Western cooking, and is made by infusing water with the flavours of chicken, fresh root vegetables and herbs. Good restaurants always make their own stocks, and is the secret to why their dishes often have that richer, deeper, “restaurant-quality” taste to them!.
It’s possible for chicken soup made from a chicken carcass to taste even better than soup made from a whole chicken. By simmering the bones and cartilage for a long time, nutrients like collagen, gelatin, minerals, and amino acids are extracted. This makes a full-bodied, healthy broth. With the right steps, you can make a rich, savory, and very satisfying pot of chicken soup at home.
Ingredients
To make chicken soup from a carcass, you’ll need:
- 1 whole chicken carcass
- 1 onion, quartered
- 2 carrots, peeled and roughly chopped
- 2 celery stalks, roughly chopped
- 1 teaspoon black peppercorns
- 1 bay leaf
- 1 handful fresh parsley
- 8 cups water
- 2 teaspoons salt
- 1⁄4 cup lemon juice
Steps
Roast the Bones
Roasting the chicken bones before making the stock intensifies their flavor, Here’s how
- Preheat your oven to 400°F.
- Place the chicken carcass on a rimmed baking sheet. Roast for 45 minutes, until the bones are browned.
- Transfer the roasted bones to a large stockpot.
Roasting coaxes out rich flavors from the bones – don’t skip this step!
Simmer the Stock
Now it’s time to simmer the bones to extract their flavor, collagen and gelatin:
- Add the onion, carrots, celery, peppercorns, bay leaf, parsley and 8 cups of water to the stockpot with the roasted bones.
- Bring the liquid to a boil over high heat. Once boiling, immediately reduce the heat to low.
- Simmer the stock for at least 3 hours and up to 8 hours, uncovered. The longer you simmer, the more rich and flavorful the broth will become.
- Occasionally skim off and discard any foam that rises to the surface while simmering.
Strain and Season the Broth
Once simmered, strain out the solids:
- Set a fine mesh sieve over a large bowl. Carefully pour the broth through to strain out the bones and vegetables.
- Discard the solids in the sieve.
- Add salt and lemon juice to the hot broth. Taste and adjust seasoning as needed.
The broth is now ready to use for chicken soup. At this point, you can cool and refrigerate or freeze the broth for later use.
Turn Broth into Hearty Chicken Soup
To complete the chicken soup:
- In a clean pot, bring 8 cups of the homemade broth back to a gentle simmer.
- Add chicken meat picked off of the cooked carcass. Simmer for 5 minutes.
- Add chopped carrots and celery. Cook for 3 minutes more.
- Add egg noodles, rice or pasta and simmer until al dente.
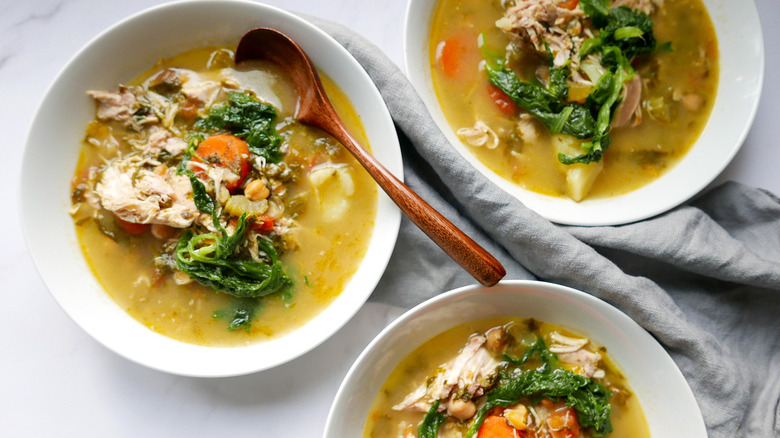
- Ladle soup into bowls and garnish with fresh parsley.
The tender chicken meat and vegetables turn the powerful homemade broth into a comforting and truly homemade-tasting chicken soup.
Tips for Maximizing Flavor
Follow these tips to coax the most nourishing gelatin and robust flavor out of a chicken carcass:
- Roast the bones before simmering – this caramelizes natural sugars and compounds in the bones to boost flavor.
- Simmer for a long time – at least 3 hours, and preferably 6-8. The longer the simmer, the more collagen and nutrients will be released into the broth.
- Add chicken feet or wings – these bony parts have lots of collagen for a more gelatinous, silky texture.
- Keep the broth under a gentle simmer – a boiling rapid boil can emulsify fats and make the broth cloudy.
- Skim the foam that rises to keep the broth clear.
- Add acid like lemon juice or vinegar – the acid helps leach minerals like calcium from the bones.
Storage Tips
Chicken broth you make at home will last for three to four days in the fridge or for months if you freeze it.
- Let broth cool completely before refrigerating. Store broth in airtight containers.
- To freeze, portion broth into freezer-safe containers. Leave 1⁄2-1 inch of headspace to allow for expansion.
- Frozen broth will keep for 4-6 months. Thaw in the refrigerator before using.
It takes time and technique, but simmering a chicken carcass makes a full-bodied, golden elixir loaded with healthful collagen proteins, minerals and gelatin. This mineralizing broth can be transformed into countless easy, nourishing meals like chicken noodle soup, chicken and rice, or use as a base for gravies and sauces. With its nourishing richness and homemade flavor, soup made from a chicken carcass is comfort food at its finest.
How to make chicken stock
Because we’re making a nice clear white chicken stock (see above), there’s no bone-roasting malarkey to take care of first which makes the whole process much quicker and less laborious. Just dump everything in a pot, add water and simmer!.

- Everything should be put in a big stock pot. Put the chicken bones, vegetables, herbs, and water in a big 7-liter or 7-quart stock pot. Three liters or three quarts of water should be enough for everything. If not, push and poke the carcasses and ingredients around in the pot to make them fit better. Don’t break or crush the bones, or the stock will become less clear. We want everything to be submerged so that the flavor can get into the water. If some of the bones stick out of the water, don’t worry. Once it starts cooking, the bodies will fall apart and end up under the water.
- Get rid of the scum. Heat the pot over medium-high and bring it to a quick simmer. As it gets hotter, foam will form on top. This is the chicken’s impurities. To keep your stock nice and clear, scoop it off and throw it away.
- Simmer for three hours. Once the water starts to quickly simmer, turn down the heat so it’s just barely bubbling. After that, leave the lid off and let it cook for three hours.
- After simmering—The picture above shows how high the water was after three hours. It has reduced by around 1/3. Your chicken stock is now ready to be stored. Here’s how to strain it, remove any extra fat, and store it:

- Strain—Put the lid on the pot to keep the bones and vegetables inside. Use a fine-mesh strainer to pour the stock into a different pot or large bowl. I use a pot in case I need to cut it down to the right size (see below). If the lid method doesn’t work for you or you’re not strong enough, you can use tongs or a large straining spoon to remove the solids and then pour the remaining liquid through a sieve. The goal is to get 2 liters or 2 quarts of chicken stock. You should have two liters or two quarts of chicken stock at the end. But it is rarely a perfect world! And that’s ok. If you don’t have enough, just add water. If you ended up with more than about 2. 25 liters or quarts, then lower the heat on the stove. If you don’t, the chicken stock might not taste very good.
- Throw away bones and vegetables that have been cooked. These have lost most of their flavor and nutrition, so they aren’t very useful. But I do cut off any extra meat for Dozer! After that, I just throw away the rest.
- Voila! Admire your beautiful and clear chicken stock!
- Divide between storage containers—At this point, I put the stock into jars or other containers so it can cool down faster. I store my chicken stock in multiples of 1 cup, which makes it easy to use. Always write the amount of chicken stock you made and the date on the containers.

- Place the stock in the fridge to fully cool it down after it has cooled to room temperature. Never put hot stock in the fridge!.
- Shaped fat: The fat will rise to the top as the stock cools. When it gets really cold, the fat hardens into a white sheet on top of the stock that looks like a lake that has frozen over. Another thing you’ll notice is that when the chicken stock is cold, it gets firm and jelly-like. This is due to the gelatin. We want gelatin because it gives the stock a rich, delicious mouthfeel that you can’t get from store-bought stock (have you ever noticed that store-bought stock never sets like this in the fridge?) So, just remember that jelly consistency means good stock!
- Remove fat—Use a spoon to remove the fat from the top and throw it away. This is actually an optional step. You can use the stock for everything from clear soups (like Chinese Noodle Soup) to rich sauces (like the sauce for Creamy Chicken Pasta). It makes the stock light and clean. You should also use stock that has been cleaned of fat when making a jus or a reduction sauce. Not if you’re going to use the stock for stews (like this one) and creamy sauces (like Mushroom Sauce), which don’t need a clear, grease-free chicken stock like we do for Chicken Noodle Soup. Then there’s no need to take out the fat.
- Stock you make at home will last for 5 days in the fridge or 6 months in the freezer. Chicken stock that has been kept in the fridge can be used right away, when it is still jelly-like. Whenever it gets hot, it quickly melts back into a liquid. If you want to use something that was frozen, let it thaw overnight in the fridge, microwave, or hot water bath to loosen it up, then melt it in a saucepan. I will sometimes just add the frozen stock block as is if I’m adding it to a liquid that is already simmering, though. It melts pretty quickly and does the same thing. All of these work for me, depending on how much time I have!
Here’s a jar of refrigerated chicken stock which has had the fat scraped off the surface.

And here it is in liquid form at room temperature. But as noted above, you can just use chicken stock in jelly form as it melts in seconds on contact with heat!.

Bones for chicken stock
I use chicken bones to make chicken stock. I find that it makes a great all-rounder, clear stock with good flavour at store-bought strength. I use chicken carcasses, which are also called chicken frames (see picture below), because they are the most cost-effective cut, liter for liter.
What is a chicken carcass? The bones and cartilage “frame” of a chicken that has had all of its meat cut off. This includes the breast, drumsticks, thighs, wings, and tail. There’s usually a decent amount of meat left on it, but it depends how nifty the butcher is with his knife skills! The balance of meat, bone and residual fat on a chicken carcass gives an excellent balance of flavour, valuable nutrients and collagen, as well as making a nice clear stock. They’re readily available here in Sydney from butchers and even grocery stores.
Some recipes will opt to use chicken pieces with meat and skin to make stock. I share my thoughts on this below! (Spoiler: I don’t agree!).

Chicken Carcass Soup
FAQ
Can you make chicken soup with chicken carcass?
Cover the roasted chicken carcass with water, and then bring it to a simmer. Let it cook for three hours, then strain off the liquid. This will make a…
What do I do with the carcass of a chicken?
You can make chicken stock very simply using the leftover cooked carcass and bones from your Sunday roast, or you can use a raw carcass, sold cheaply at most butcher’s. If you’ve got leftover chicken bones but you don’t want to make stock straightaway, store them in the freezer in the meantime.
Is chicken carcass good for soup?
With this simple soup, you can use up the bones and meat from a roasted or rotisserie chicken. This recipe is awesome for so many reasons. First, because there is just something so satisfying about making a pot of soup from scratch without even using a can of broth!.
How long do you need to boil a chicken carcass?
Let simmer uncovered at a low simmer for 4 to 6 hours. Check every hour or so to be sure there is still enough water in the pot.