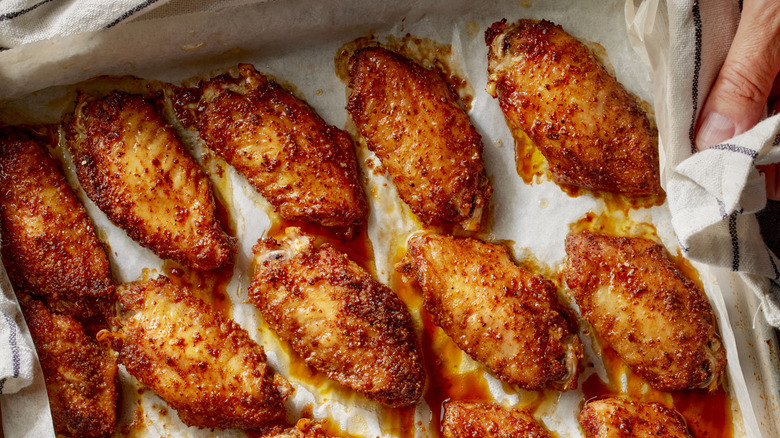
Baking chicken wings is supposed to be fairly straightforward and cut out a lot of the mess that comes with frying. But it turns out that they are a little challenging to pull off. Too much moisture yields a soggy texture, and not cooking at the optimal oven temperature for baked chicken can mean dried-out meat or scorched skin. There is a chance that half of your crispy skin will stick to the pan even if you get everything else right.
I know exactly how you can avoid this frustrating ordeal with a few simple tricks. You have to create a barrier between those precious wings and the pan itself . think nonstick spray, parchment paper, or even a wire rack. These strategic moves allow the wings to slide right off after baking, leaving you with perfectly crisp skin every time.
Depending on your preference, there are benefits to whichever method you choose. The nonstick spray is a quick fix that works well for most pans, while parchment paper makes cleanup a breeze. But it is my humble opinion that the best solution is the wire rack because it allows heat to circulate evenly around the wings. By using the right tools and techniques, you can bake wings that are crispy, delicious, and hassle-free.
I’m sure you’ve all taken a tray of chicken wings out of the oven only to find that half of the crispy skin was stuck to the pan? Yeah, me too! There’s nothing worse than seeing your perfectly seasoned wings fall apart as you try to move them from the pan to the plate. After many batches of wings and way too many broken baking sheets, I’ve finally mastered the art of non-stick oven-baked chicken wings.
This guide will show you all of my tried-and-true ways to make chicken wings that are so crispy they just fall off the pan. These tips will help you save your wings (and your sanity) whether you’re getting ready for a game, a family dinner, or just a wing craving!
Why Do Chicken Wings Stick to the Pan?
Before diving into solutions let’s understand why wings stick in the first place
- Moisture: Excess moisture is the #1 culprit behind sticky wings
- Direct contact: Wings sitting directly on a hot surface can fuse to it
- Improper preparation: Skipping certain prep steps can lead to sticking
- Wrong cooking temperature: Too low temps don’t render fat properly
Essential Tools for Non-Stick Wings
Having the right equipment makes all the difference when baking wings:
- Baking sheet or tray: A sturdy, good-quality baking sheet is essential
- Parchment paper or aluminum foil: Creates a non-stick barrier
- Wire rack: Elevates wings for better airflow (optional but recommended)
- Paper towels: For drying wings thoroughly
- Tongs: For flipping and handling wings
- Meat thermometer: Ensures wings reach 165°F (74°C)
- Cooking spray or oil: Creates a non-stick coating
Three Proven Methods to Prevent Sticking
Let’s explore the three best techniques for keeping your wings from sticking to the pan:
Method 1: The Nonstick Spray Approach
This quick and simple method works well for most pans:
- Thoroughly dry your wings with paper towels
- Preheat your oven to 400°F (200°C)
- Coat your baking sheet evenly with nonstick cooking spray
- Arrange wings in a single layer with space between each piece
- Bake for 40-45 minutes, flipping halfway through
Pro tip: Don’t use nonstick spray on nonstick baking sheets as it can damage the coating over time.
Method 2: The Parchment Paper Method
Parchment paper is fantastic for easy cleanup and creating a non-stick surface:
- Dry your wings completely with paper towels
- Preheat oven to 400°F (200°C)
- Cut parchment paper to fit your baking tray
- Place the paper on the tray (no need to grease it)
- Arrange seasoned wings on the parchment paper
- Bake for 40-45 minutes, flipping halfway
Pro tip: For extra insurance against sticking, you can lightly spray the parchment paper with cooking spray before arranging the wings.
Method 3: The Wire Rack Method (My Personal Favorite)
For the crispiest wings that don’t stick, this method is unbeatable:
- Pat wings dry with paper towels
- Preheat oven to 425°F (220°C)
- Line a baking sheet with foil or parchment (for easy cleanup)
- Place a wire rack on the lined baking sheet
- Spray the wire rack with cooking spray
- Arrange wings on the rack with space between them
- Bake for 35-40 minutes, flipping halfway
Pro tip: The wire rack allows hot air to circulate around the entire wing, resulting in all-over crispiness and preventing wings from sitting in their own juices.
The Perfect Wing Prep: Step-by-Step
No matter which method you choose, proper preparation is crucial:
1. Dry Those Wings!
Moisture is the enemy of crispy, non-stick wings. Here’s what to do:
- Remove wings from packaging and pat thoroughly with paper towels
- Let wings sit uncovered in the fridge for 1-2 hours if time permits (this dries them even more)
- Pat dry again before seasoning
2. Season Strategically
Seasoning not only adds flavor but also helps create a barrier between wings and pan:
Basic Seasoning Mix:
- 1 tsp salt
- 1 tsp pepper
- 1 tsp garlic powder
- 1 tsp paprika
Mix these ingredients and toss your wings until evenly coated.
3. The Oil Factor
A light coating of oil helps prevent sticking and promotes browning:
- Choose oils with high smoke points like vegetable, canola, or avocado oil
- Use a brush or spray bottle to apply a thin, even layer
- Make sure wings are completely coated but not dripping
Temperature and Timing Guide
Cooking at the right temperature is crucial for non-stick results:
| Wing Size | Temperature | Cooking Time | Internal Temp |
|---|---|---|---|
| Small | 400°F-425°F | 35-40 mins | 165°F |
| Medium | 400°F-425°F | 40-45 mins | 165°F |
| Large | 400°F-425°F | 45-50 mins | 165°F |
Always flip your wings halfway through cooking for even browning!
The Baking Powder Secret
For crispy wings that don’t stick, try baking powder. This is a pro tip that many home cooks don’t know.
- Pat wings completely dry
- For every pound of wings, add 1-2 teaspoons of aluminum-free baking powder to your seasoning mix
- Toss wings until evenly coated
- Arrange on your prepared pan using one of the methods above
The baking powder helps dry out the skin and changes its pH level, promoting browning and crispiness without sticking.
Flavor Variations That Won’t Stick
Once you’ve mastered the non-stick technique, try these delicious flavor combinations:
• Classic Buffalo: Toss baked wings in a mix of hot sauce and melted butter. • Honey Garlic: Mix honey, soy sauce, and minced garlic. • Lemon Pepper: Combine fresh lemon zest with cracked black pepper. • BBQ Style: Use the last five minutes of baking to brush on your favorite barbecue sauce. • Teriyaki: Glaze with a mix of soy sauce, brown sugar, and ginger.
Storage and Reheating Tips
If you somehow have leftovers (unlikely!), here’s how to store and reheat them without sticking:
- Allow wings to cool completely
- Store in an airtight container in the refrigerator (up to 3-4 days)
- To reheat, place on a wire rack over a baking sheet
- Bake at 350°F for 10-15 minutes until heated through and crispy again
Troubleshooting Common Wing Problems
Even with the best techniques, things sometimes go wrong. Here are solutions to common issues:
Problem: Wings still stuck to the pan
Solution: Make sure wings are completely dry before baking and consider using parchment paper or a wire rack next time
Problem: Wings not crispy enough
Solution: Increase oven temperature by 25 degrees or try the baking powder trick
Problem: Wings too dry
Solution: Reduce cooking time by 5 minutes or cook at a slightly lower temperature
Final Thoughts
Cooking chicken wings in the oven without sticking is totally achievable with the right preparation and technique. Whether you prefer the simplicity of nonstick spray, the convenience of parchment paper, or the superior results of a wire rack, you now have all the tools to make perfect wings every time!
I personally find the wire rack method gives the most consistently awesome results. The elevated position allows heat to circulate around the entire wing, creating that restaurant-quality crispiness we all crave. Plus, cleanup is a breeze when you line the baking sheet with foil underneath.
So next time you’re craving wings, don’t worry about them sticking to the pan. With these methods, you’ll be enjoying perfectly crispy, intact wings that slide right off the pan and onto your plate. Happy wing-making!
FAQ: Your Wing Questions Answered
Q: Can I use frozen wings or do they need to be thawed?
A: For best results, thaw wings completely and pat dry before cooking. Frozen wings release excess moisture, increasing the chances of sticking.
Q: How do I know when my wings are done?
A: Wings should reach an internal temperature of 165°F (74°C) and have crispy, golden-brown skin.
Q: Can I make wings healthier by using less oil?
A: Yes! The wire rack method naturally drains excess fat, and you can use just a light coating of oil or cooking spray.
Q: What sides go well with oven-baked chicken wings?
A: Traditional companions include celery and carrot sticks with blue cheese or ranch dressing. Fries, potato wedges, or a fresh salad also pair wonderfully.

Nonstick spray vs. parchment paper: Which one wins?
Both nonstick spray and parchment paper are good options, but each has its strengths. Nonstick spray is a go-to for convenience — just a quick spritz on your baking sheet and youre good to go. For best results, coat the pan evenly before arranging the wings, and dont skimp on the spray. Remember not to use it on a nonstick baking sheet, as it can damage the coating over time. This method works pretty well, though sometimes I still get some sticking.
Parchment paper is a favorite for its versatility. Not only does it prevent sticking, but it also eliminates the need for scrubbing stubborn bits off the pan afterward. Parchment creates a smooth, nonstick surface thats perfect for sticky marinades. Plus, its disposable, making cleanup almost effortless. To use parchment paper, simply cut a sheet to fit your baking tray, lay it down, and place your wings on top. The problem with parchment is that I almost always end up with my wings coming up with a little bit of paper.
If youre torn between the two, consider combining them. Spraying nonstick spray on parchment paper ensures an extra layer of protection, especially for heavily coated or sticky wings. This hybrid method is a game-changer for avoiding sticking while also making cleaning up afterwards way easier.