A complete guide to dry brines including a simple dry brine chicken recipe that creates a juicy flavorful chicken and crispy skin! Never suffer dry chicken again!.
There is no more universal dinner than a roast chicken. Our ancestors have probably been making it since they discovered fire.
But this dry brine recipe also works for other birds like these Lemon Pepper Roast Cornish Game Hens!
It’s perfect for a casual weeknight dinner. And with a little attention you can dress it up for a weekend evening. Simple, quick, versatile, the universal dinner.
If you roast a whole chicken, you also get livers, which are a great bonus. For your next easy appetizer, try this simple rustic homemade chicken liver paté.
It dries out easily. And anyone who has had a dried out chicken will agree: it’s pretty inedible. While are plenty of methods of cooking chicken that settle that argument….
You don’t need dry-brining to cook an excellent chicken. It will stay moist and flavorful, though, and you can even dress it up for a dinner party. Dry brining is the way to go!
It’s a little extra work, but sooo worth it. The next time you want to impress, try out a simple dry brine chicken.
A simple but very effective way to improve the taste and texture of chicken is to dry brine it. When you salt the chicken and put it in the fridge for a while, the salt goes deep into the meat and flavors it from the inside out. To get the best results, many home cooks want to know how long to dry brine chicken. The best dry brining time depends on a number of things, such as the chicken’s size and cut, as well as the cook’s personal taste. This complete guide will teach you everything you need to know to make dry brined chicken the right way.
What is Dry Brining?
Before jumping into brining times, it helps to understand what dry brining is and why it works so well. Dry brining, also known as “salting” or “cure-drying”, involves rubbing chicken pieces with salt and other seasonings, then letting them rest in the fridge uncovered for a period of time before cooking.
In a wet brine, the chicken soaks in a saltwater solution. In a dry brine, the salt is the only thing that gets into the meat and flavors it. The salt, through osmosis, first takes the water out of the chicken. The water then breaks down the salt, creating a very strong brine. The salty liquid is reabsorbed by the meat, which changes the structure of the proteins to help them hold on to more water while cooking.
Dry brining not only makes the chicken more juicy and tender, but it also gives it a deep flavor and helps the skin get really crispy when it’s roasted. It’s an easy way to make your chicken taste even better.
Factors That Affect Dry Brining Time
When determining the ideal dry brining time, there are a few key factors to consider:
Size and Cut of the Chicken
- Smaller cuts like chicken breasts or wings require less time, usually 1-4 hours.
- Larger cuts like whole chickens or bone-in thighs need more extended brining, 6-24 hours.
Thickness of the Meat
- Thick cuts like breasts or legs benefit from longer brining times.
- Thin cuts like wings or boneless thighs require less time.
Personal Taste Preferences
- If you prefer well-seasoned, salty chicken, brine for longer.
- For more subtle seasoning, reduce the brining time.
Refrigerator Temperature
- Colder fridge temps around 34-38°F are best for safety and texture.
- Monitor that the temp stays consistent during brining.
Salt Amount and Type
- Use less salt for a shorter brine and more for a longer brine.
- Kosher salt is ideal, about 1/2 tsp per lb of chicken.
By considering all these factors, you can fine-tune the dry brining time to suit your specific needs and preferences.
Recommended Dry Brining Times
As a general guideline, here are the recommended dry brining times for various cuts and sizes of chicken:
- Whole chicken (3-5 lbs) – 12-24 hours
- Bone-in chicken breasts – 4-8 hours
- Boneless chicken breasts – 1-4 hours
- Chicken thighs (bone-in or boneless) – 4-12 hours
- Chicken wings or drumsticks – 1-4 hours
For smaller boneless cuts like breasts or tenders, a quick 30 minute to 2 hour brine is usually sufficient. Whole birds and larger bone-in pieces benefit from a longer 12-24 hour brining time.
Keep in mind these are just general estimates. Start on the slower end of the time range and make changes as needed in later tries based on what works best for you. It’s simple to add more brining time, but hard to take away too much brining.
Step-By-Step Guide to Dry Brining Chicken
Follow these simple steps for flawlessly dry brined chicken every time
-
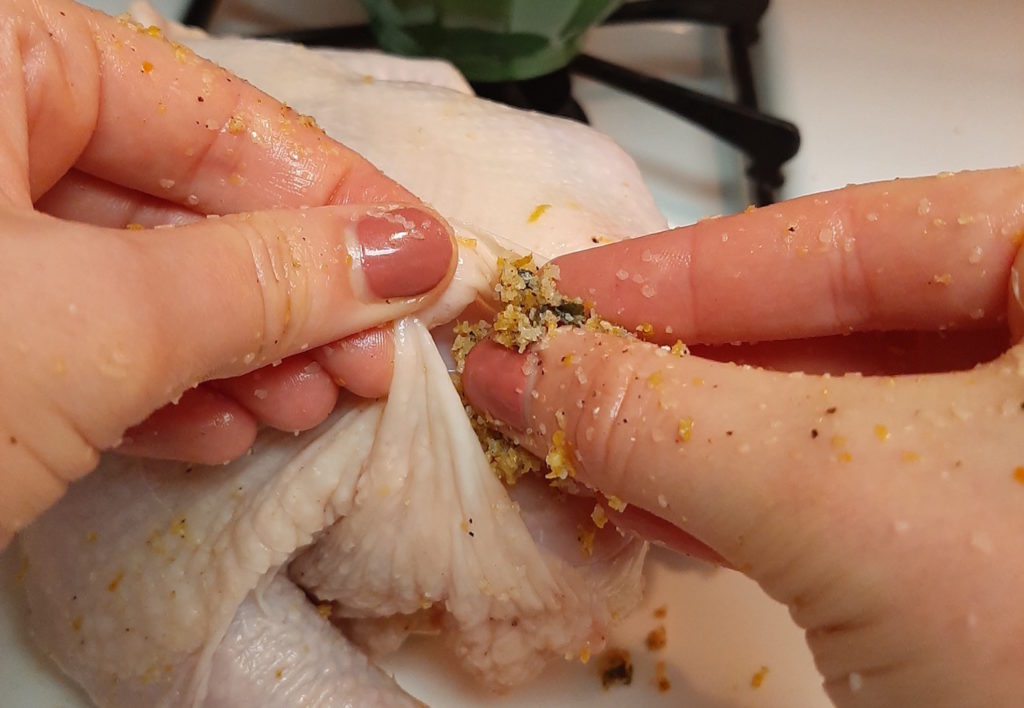
Trim and pat the chicken dry – Remove it from packaging and trim off any excess fat or skin. Pat the chicken pieces very dry with paper towels. The drier the surface, the better the salt and seasonings will adhere.
-
Apply an even layer of salt – Use kosher salt and sprinkle it evenly all over the chicken, about 1/2 teaspoon per pound. You can also add other seasonings like black pepper, garlic powder, or herbs.
-
Arrange the chicken on a wire rack – Place the chicken on a wire rack set over a rimmed baking sheet. This exposes the surface to air flow, resulting in drier skin.
-
Refrigerate uncovered for the recommended time – Put the chicken in the fridge unwrapped. Whole chickens can be loosely tented with foil. Refrigerate for the minimum brining time based on the size and cut.
-
Rinse and pat chicken dry – Briefly rinse the chicken under cool water to remove excess salt. Pat very dry with paper towels.
-
Roast or cook as desired – The chicken is now ready to be cooked using your favorite seasonings or recipe. Enjoy juicy, tender, well-seasoned chicken!
Dry Brining Chicken Tips for the Best Results
- Chill the chicken in the fridge before dry brining for faster and safer results.
- Use a wire rack to allow air flow and drying – this helps the skin crisp up beautifully.
- Resist rinsing too much after brining to keep the seasoned flavor intact.
- Avoid re-seasoning before cooking as the chicken is already well seasoned inside and out.
- Reduce oven temp by 25°F since brined chicken cooks faster with the added moisture.
- Brine in the fridge, not on the counter. Fridge temps inhibit bacteria growth.
Frequently Asked Questions
Can you dry brine chicken too long?
It is possible to over-brine chicken. More than 24-48 hours in the fridge risks the meat becoming too salty. For food safety, it’s best to adhere to the recommended brining times.
Should you rinse chicken after dry brining?
A brief rinse and pat dry is recommended after extended brining over 12 hours. This removes any excess surface salt. Shorter brines under 6 hours usually don’t need rinsing.
Can you reuse the salt from dry brining?
It’s not recommended to reuse the salt from dry brining raw chicken. The salt may contain bacteria and lead to cross-contamination. Always use fresh salt each time for food safety.
What happens if you don’t dry brine chicken long enough?
Chicken that hasn’t brined long enough may come out under-seasoned and the meat not as juicy or tender. Increase the brining time gradually in future attempts to achieve the desired flavor and texture.
Get Perfectly Seasoned Chicken Every Time
While dry brining requires minimal active effort, the results are remarkably better flavor, juicier meat, and crisper skin. Now that you know the ideal brining times for different cuts of chicken, you can confidently use this technique for mouthwatering home-cooked meals. Remember to account for the size of the pieces, your taste preferences, and proper food safety. In no time, you’ll be serving deeply seasoned, irresistibly tender and juicy chicken to rave reviews from family and friends.

Reasons you should choose a Dry Brine:
- Same level of moisture
- The chicken will have more flavor
- Retains the natural juices and flavors of the chicken
- Easier prep
- Easier storage during brining
Sound good? Good. Let’s get started!
What Is Dry Brining?
Dry Brining is essentially a salt cure of your meat. How is it different from just sprinkling some salt on your chicken before throwing it in the oven? Simply, how long before cooking you salt it.
A dry brine usually goes on at least 24 hours but sometimes as many as 96 hours before you cook the chicken. The longer you do it, the more juicy and flavorful the meat will be at the end. Just rubbing some salt and spices on the chicken’s meat and skin a few days before cooking can make a huge difference. How exactly?.