NOTE: Please be aware that this blog post contains photos of the chicken butchering process. If you’re uncomfortable seeing these s, this post isn’t for you!.
Now it’s time to learn how to butcher your chickens. Processing our free-range chickens means a much better completion of the process for our meat than the factory alternative.
Follow along as I teach you how to butcher a chicken at home from beginning to end. Learn how to kill, pluck, clean, and skin it with or without expensive equipment. Video included for both methods!.
Butchering your own chickens can be a daunting task but it allows you to take control of your food source and ensure the ethical treatment of the animals. This comprehensive guide will take you through each step of the process to butcher a chicken humanely and efficiently.
Why Butcher Your Own Chickens?
There are a few reasons why you should butcher your own chicken instead of buying cuts already made at the store:
-
You know exactly how the chicken was raised and treated throughout its life. This gives you peace of mind that the meat is coming from an ethical source
-
It saves money: Buying whole chickens and chopping them up yourself is often less expensive per pound than buying chicken pieces.
-
You control the quality. Sometimes salt water and other things are added to store-bought chicken. Home butchered chicken contains just pure meat.
-
It’s a useful skill to have. Butchering your own meat allows you to be more self-reliant.
However, it’s understandable if you feel apprehensive about taking a life. Consider outsourcing the initial dispatch if you are uncomfortable with that aspect. The important thing is to ensure the chicken has a quick, humane death.
Supplies Needed
You’ll need the following supplies:
- Sharp knife (6-8 inch boning or chef’s knife)
- Cutting board
- Kitchen shears
- Large pot for scalding
- Thermometer
- Plucking station (tub, table, etc)
- Clean containers for giblets, pieces
- Water source for rinsing
- Trash bin for waste
- Freezer bags
Take time to organize your workspace before starting. Good prep makes the process smoother.
Step-by-Step Butchering Process
Follow these steps for a clean butcher job:
1. Dispatching the Chicken
Sever the jugular vein or carotid artery for a quick, humane death. Bleed out thoroughly. This takes 1-2 minutes.
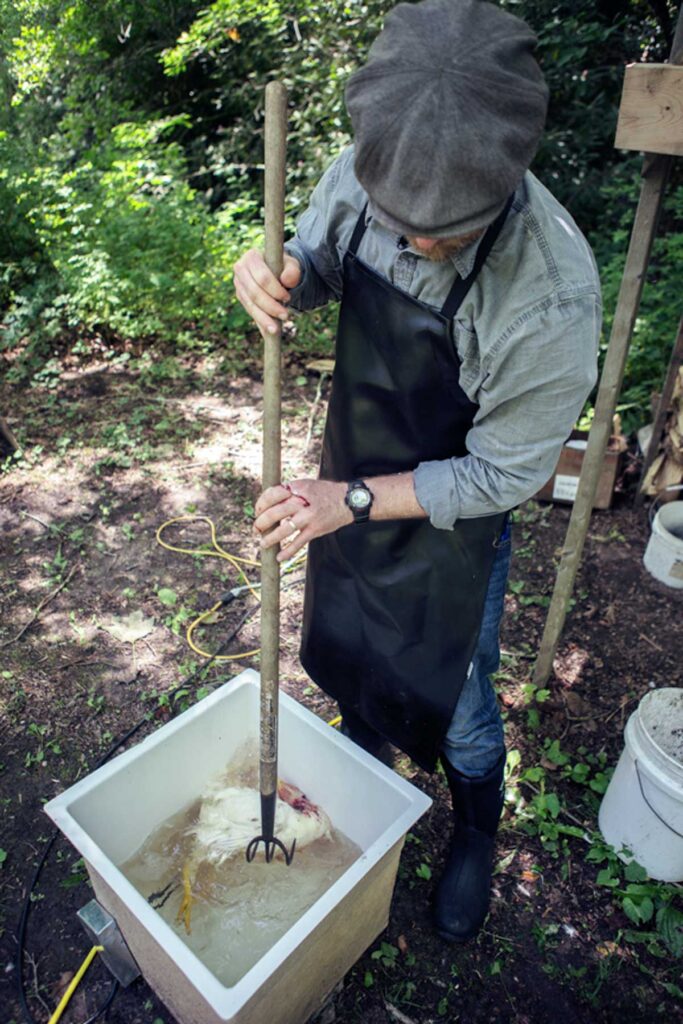
2. Scalding and Plucking
Submerge the bird in 145°F to 150°F water for 30-90 seconds to loosen feathers. Test wing feathers periodically. Pluck remaining feathers once scalded. Singe any hairs with a flame.
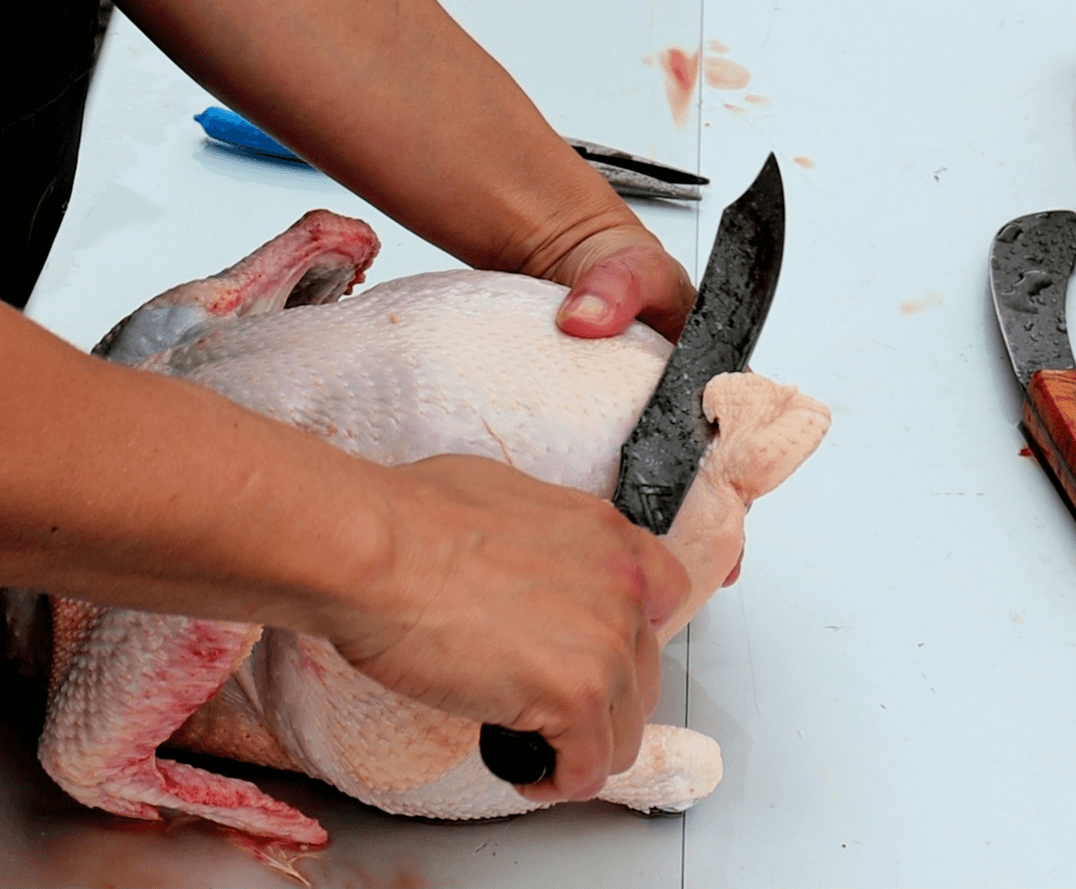
3. Evisceration
Cut around the vent. Make an incision up the belly without puncturing organs. Remove viscera in one piece. Inspect and clean body cavity thoroughly. Collect heart, liver, gizzard to use as giblets if desired.
4. Removing Head and Feet
Chop off head and feet at the joints using knife or shears. You can save feet for making stock.
5. Cutting Up the Chicken
Remove wings, thighs, legs, and split breast by cutting through the joints. Slice off the back to use for stock.
6. Final Rinse and Chill
Rinse all pieces. Chill in ice bath for 1-2 hours before bagging.
Storage and Food Safety
After butchering, store the chicken pieces in airtight containers or freezer bags in the fridge for 2-3 days max or in the freezer for 9-12 months. Always label packages with the date.
Be diligent about sanitation during the entire process to prevent bacterial contamination. Wash hands, equipment, and surfaces frequently. Keep raw chicken separate from other foods. Refrigerate promptly.
Properly handled, freshly butchered chicken is safe to eat immediately after chilling. Cook thoroughly to 165°F internal temperature.
Get the Most Use From Your Chickens
Besides meat, consider using other parts of the chicken:
- Make broth from bones/carcass
- Save liver, heart, gizzard for giblet gravy or cooking
- Use feet for gelatinous chicken stock
- Compost skin, fat, organs
Butchering your own chickens is a time commitment but ultimately a rewarding experience. With the right technique and proper care, you can fill your freezer with wholesome, humanely raised meat.
Supplies Needed for Minimalist Method
I’m sure our ancestors were very good at killing chickens, and they didn’t need many tools to do it. You can use their minimalistic approach and fill your freezer with meat. They used the equipment available to them.
- Knife: You must have a sharp knife for the butchering process to be safe and humane.
- Bucket – Used to drain the blood and innards.
- String: You can tie the bird down with rope, hay string, or twine.
- Large Pot – Filled with water and heated.
- Fire or Stove – Needed to heat the water.
- Water – Needed to scald the feathers and clean.
In modern times, we have way more equipment available to us. Using the minimalist approach will work just fine if you are butchering a small flock of 12-15 birds. However, if you have a lot of birds, you will save yourself a great deal of time and work if you purchase or borrow equipment.
24 Hours Before or Early the Day of Butchering
Designate an area for processing that’s shady and has access to electricity and running water. Set up your processing area the day before or the early morning before slaughter and sharpen your knives.
Withhold feed from chickens to make sure their crop is empty. This is not a necessity but makes it easier and cleaner when processing. Depending on how many chickens I’m going to butcher, I just put them in a cage or a pastured poultry pen before I feed them in the morning of the butchering. This way, the chickens don’t get fed at night.
How to Butcher Chicken Simple, Easy and Humane Step by Step instructions
FAQ
How to butcher chicken step by step?
How to Butcher a ChickenStep One: Remove the feet. Step Two: Access the internal cavity of the chicken. Step Three: Remove the innards. Step Four: Removing the head/neck, and cutting out the crop.
How long should you not feed chickens before butchering?
Before culling the chickens, be sure to restrict their food intake for at least 12 hours and no more than 24 hours. Remember, this is the one worst day of their entire lives. Killing a chicken with a crop, stomach, and intestine full of food is not fun. I have done this, and it can be a mess if you make the wrong cuts!.
How long after butchering a chicken can you eat it?
How Long Should a Chicken Rest After Butchering? We all find ourselves anxious to eat a fresh chicken, but you should wait 24 hours before cooking. When you place the chicken into a cooler and chill, it allows the muscles to begin decomposing.
How old does a chicken have to be to be butchered?
Chickens labeled as “Broiler-fryers” are young, tender chicken about 7 weeks old; “Roasters” are older chicken, about 3 to 5 months old; “Capons” are male chickens about 16 weeks to 8 months old; and “Stewing/Baking Hens” are mature laying hens 10 months to 1 1/2 years old.